The final after effects session.
Things we are going to be looking at;
- key framing
- 'grouping'
- audio
''press U to see all the animated properties of a layer''
The dots along the motion path represent frames and because the dots are equally spaces it shows the object moves at a constant speed.
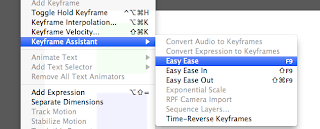
To make an animation run more realistically you can ease in and ease out by selecting the keyframe and choosing one of them, this allows the animation to either accelerate or decelerate giving you a more realistic animation movement.
You can use the 'easy ease' option by selecting to keyframes and the going to animation - keyframe assist - easy ease, which will accelerate out then decelerate to a stop.
The graph editor
Select a layer property (like position) and click the graph tool.
The graph of a layer easing in and out, the keyframes are shown as white dots
The graph of an object moving at a constant speed.
By moving these curves you can customise the movement of the speed of the object, to ease in and out just as you would lie.
Making a pendulum swing
Using the rotation tool, change the anchor point to allow the pendulum to swing, to do this press Y and move it out side of the shape, then keyframe your starting angle and ending angle.
Click the graph thing then change it to 'edit speed graph'
This is the pendulum starting off slow and then picking up pass and slowing down.
Parent teacher layer.
In after effects you can select a layer and select it as the parent layer to other layers, this is helpful so you can do complex animation using as little keyframes as possible.
click rove across time on the silly confusing layers on the graph and it should smoothen it out.


No comments:
Post a Comment